AdHoc Reports
Screen Location - Main Menu > Reports > Ad Hoc Reports
Note: Ad-Hoc reports are column based queries that can be exported to Excel. If you cannot find what you are looking for on a Pre Written report, you can probably write it yourself in an Ad-Hoc report.

- Saved Queries - Lists your saved queries.
- Select an Existing Query and choose the following:
- Open - Moves you to the Run/Save screen where you can Run the query, save it as a Text file (.csv), or an Excel file (.xls)
- New - Creates a New Query using the Wizard.
- Delete - Deletes the selected Query.
- Copy to User - Copies the existing Query to another user.
- Schedule - If your query does not contain filter prompts, you will be able to schedule it to be emailed out.
- Start, Previous, Next and Finish - Navigate through the Wizards screens.
- Done - Close the Ad Hoc Query Wizard.

- Note: If you hit New or Next, after selecting an existing query, you have the ability to select what fields you want to include in your query.
- Select the Ad Hoc view from the drop down that contains the information you want to display.
- Double click the fields to move them to the right side of the screen.
- Use the Up / Down Arrows to put them in the order you want to see them.
- Click the Next button to go to the Next Screen.
- Note: Most views contain all the fields you need. However sometimes you may need to select fields from more than one view. When you have finished with one View just Select the second View and select the more fields.

- Note: This screen will come up only if you have selected fields from more than one view. This screen will gives the ability to tell the program how these two views are related. This is a very difficult subject and takes some time for all users to master. Please do not hesitate to call FreightWare Technical support for assistance.
- Select the main view on the left and the supporting view on the right.
- Select the ID fields that are common to both views.
- Select the type of Join, The Include All from Left is the most common.
- Click the Add Join button to include the join in the query.
- Click the Next button to go to the Next Screen.

- Select the view from the dropdown.
- Select the field you want to filter on.
- Choose the Operator from the dropdown.
- Choose the Criteria Type:
- Date Range = Predetermined date ranges. Same as on the Report Selection Screen.
- Prompt = They Query will pause and require you to enter your filter data when you run the query. Note: Using Prompt will disable the scheduling feature discussed later in this document.
- Criteria = Fixed filter data. The query will always run using this criteria. Note: It can be modified on the Run / Save screen.
- Choose And / Or / End to add this to the filter list.
- Click the Next button to go to the Next Screen.

- Select the view from the dropdown.
- Select the field you want to sort on.
- Choose your sort order: Ascending / Descending to add it to the sort list.
- Click the Next button to go to the Next Screen.

- This screen allows you to make any modification to the SQL Statement that will run. Adjust any criteria, add / remove fields. Note: Be careful not to change your SQL Statement so it will not run. Use the Wizard to make any changes.
- Click the Save Button to save your Query. If it already exists you will be prompted to overwrite it. Note: This will take you back to the beginning of the wizard. Click Finish to get back to the Run / Save screen and to access the Scheduling screen.
- Select you Output Option:
- Query - Outputs the results to the screen in a query grid window. This is good to verify the results are as expected.
- Excel Spreadsheet - Generates and saves the query in a Mircrosoft Excel Spreadsheet on your local computer. Note: You must be mapping your computer's drive where you want to save the query. Call HaulWare support for assistance with this.
- Text File - Generate and saves the query in an Comma Delimited ASCII text (.csv) file. Note: You must be mapping your computer's drive where you want to save the query. Call FreightWare support for assistance with this.
- Click Start, Previous, Next and Finish to Navigate through the Wizards screens.
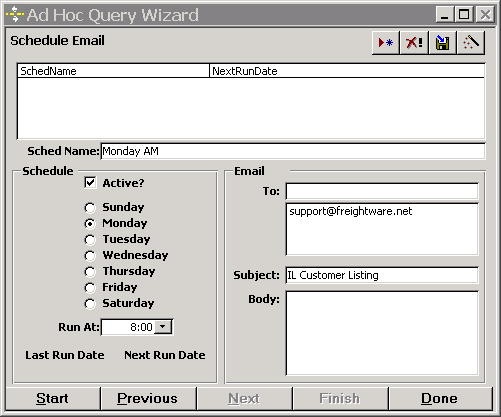
Note: Scheduling an Ad Hoc query allows you to have the system email the query on a scheduled basis. You can have multiple schedules for the same Ad Hoc.
- Click Active in order for the schedule to run.
- Select what days of the week for the query to run.
- Select what time of the day to run the query. Note: Each schedule can only run once a day at the top of the hour. You can have multiple schedules if you need it to run more than once a day.
- Enter one or more email addresses in the To field. When you tab off the field it will add them to the address box. Double click to remove.
- Add a subject to your email.
- Add a body to your email.
- Using the buttons at the top: New, Delete, Save and Test the query. Test will immediately send an email to the addresses with the query attached.
- Note: The attachment is always a Tabbed Delimited Text File.
