Standard Scanning Setup
- Be sure FreightWare Online can see your C: drive.
- <Right-click> on your FreightWare Online desktop icon.
- <Left-click> on Edit.
.png)
- Click the Local Resources tab.
- Click the More button (Windows 7)
- Be sure your Drives checkbox is schecked - Windows 7 (Expand Drives and check C:).

- Click OK.
- Click the General tab and click the Save button.
- If you have FreightWare Online open, then log out completely and log back in.
- Create the C:Program FilesArtronixScans folder.
- <Right-click> the Start button in the lower left corner.
- <Left-click> on Explore.
- In the left window pane, click on your C: drive.
- In the left window pane, click on your Program Files folder.
- In the right window pane, <right-click> in an open area and <left-click> New, <left-click> on Folder.
- Enter Scans for your folder name - your address bar should read as follows:

- Configure your scanning software that came with your scanner or another compatible 3rd party scanning software with the following settings and save to a profile (if possible):
- Black and white
- 150 dpi
- Image Format: .tif (not .tiff)
- Output to the C:Program FilesArtronixScans folder
- Resulting image size whould be less than 200 KB and closer to 100KB.
Standard Scan Procedure
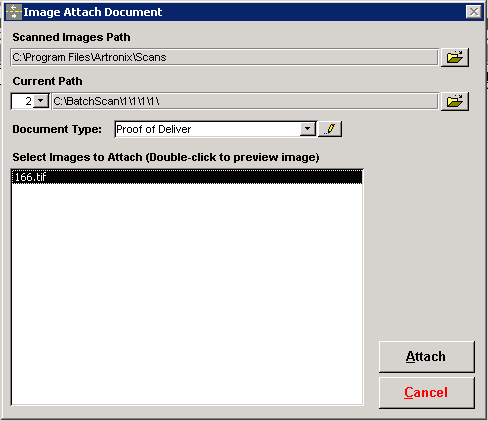
- Scan images that pertain to a single load into the C:Program FilesArtronixScans folder.
- In FreightWare, open the load from the Load Booking or Freight Billing option.
- Click the Image button, then click the Scan button.
- Select your document type - BOL (Bill of Lading) and POD (Proof of Delivery) should be available from the drop down list.
- You can add more types to the drop down list by clicking the pencil box.
- Click the Attach button.
- Select the images you want to upload
- Hold down the <Ctrl> key when selecting more than one image.
- Click the Attach button.
- Click OK.

For higher volume document scanning, Artronix offers a Batch Scanning Module.